Blog

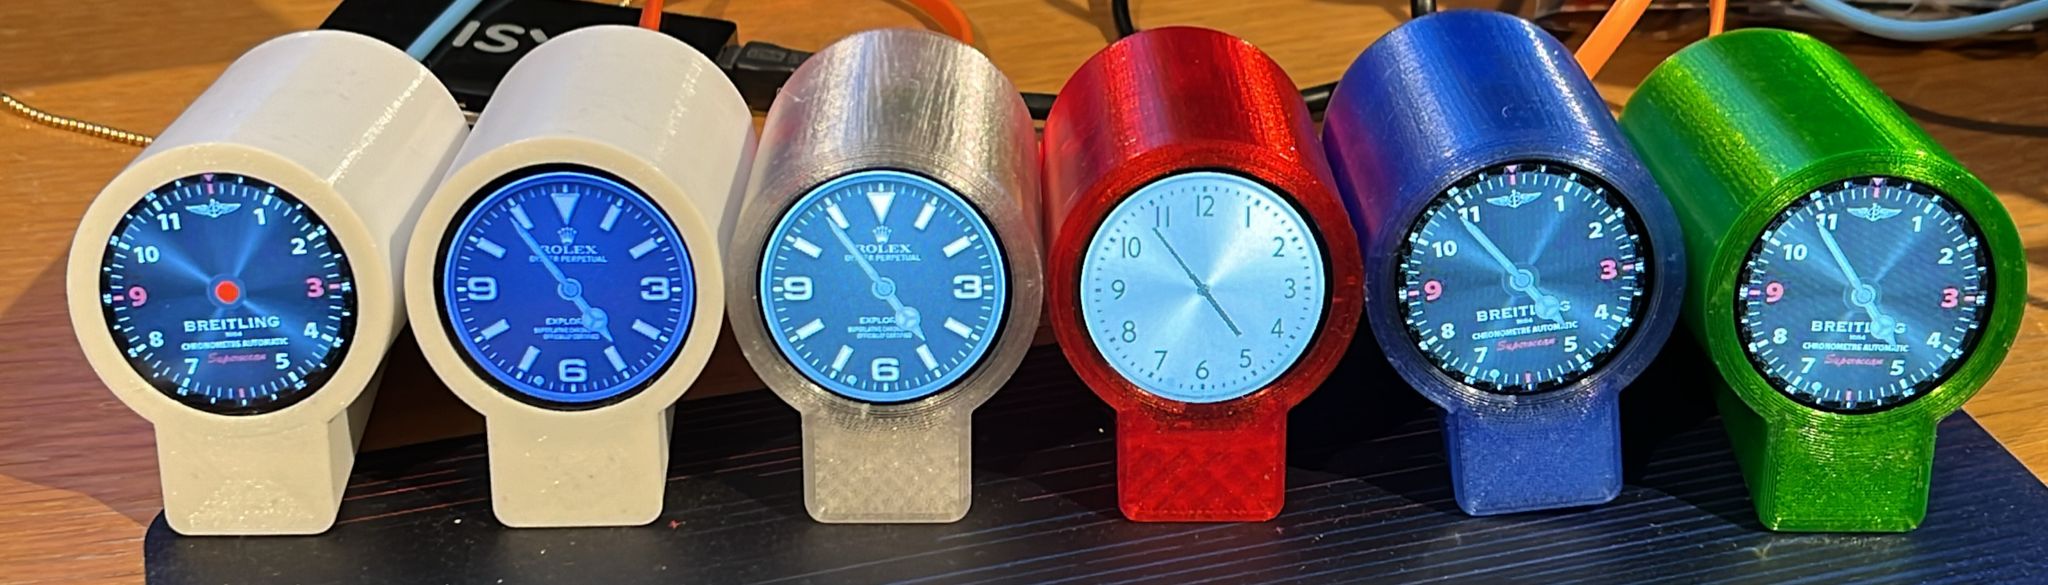
  • Analog clock on a round display

    Analog Clock on round display

    I built an analog clock on a round TFT display, running on an ESP32. The clock face looks like a proper analog clock — hour, minute and second hands on a round display, 3D-printed case included. All source files and STL files are on GitHub. There is also an ESP8266 version.

    Setup

    After flashing, the clock creates a wifi access point called RondKlokje. Connect to it, open http://192.168.4.1, and enter your wifi credentials. From that point on it syncs time automatically.

    Building and flashing

    Everything is automated via a single script. Running ./compile.sh takes care of the full chain:

    • Downloads arduino-cli
    • Downloads the correct (older) version of the ESP32 core — the latest doesn’t fit in flash
    • Creates the LittleFS partition image
    • Compiles the sketch
    • Uploads both the data partition and the firmware to the board

    3D printed case

    The STL files for the case are in the 3D folder. The print holder is designed specifically for the D1 mini ESP32 form factor.

  • Kotlin typealias

    The typealias can be handy to define very simple types. But be aware that it is not represented in bytecode — typealiases are simply replaced by the type they represent during compilation, and so can’t be used to distinguish between different aliased types in function signatures.

    This also has consequences for dependency injection. When bean injection relies on naming and that bean gets renamed, Spring may silently inject an alternative based on type matching, leading to unexpected behaviour.

    import org.junit.jupiter.api.Assertions
    import org.junit.jupiter.api.Test
    import org.springframework.beans.factory.annotation.Autowired
    import org.springframework.beans.factory.annotation.Qualifier
    import org.springframework.boot.test.context.SpringBootTest
    import org.springframework.boot.test.context.TestConfiguration
    import org.springframework.context.annotation.Bean
    
    typealias TypeOne = String
    typealias TypeTwo = String
    
    typealias SignatureOne = () -> String
    typealias SignatureTwo = () -> String
    
    @SpringBootTest
    class ExperimentMilo {
        @TestConfiguration
        class TestConfig {
            @Bean
            fun funOne(): SignatureOne = { "FunOne" }
    
            @Bean
            fun funTwo(): SignatureTwo = { "FunTwo" }
        }
    
        @Autowired lateinit var funOne: SignatureOne
        @Autowired lateinit var funTwo: SignatureTwo
    
        @Autowired @Qualifier("funOne") lateinit var functionOne: SignatureOne
        @Autowired @Qualifier("funTwo") lateinit var functionTwo: SignatureTwo
    
        @Test
        fun testBeanSignature() {
            val resultOne = funOne.invoke()
            val resultTwo = funTwo.invoke()
    
            Assertions.assertEquals("FunOne", resultOne)
            Assertions.assertEquals("FunTwo", resultTwo)
        }
    
        @Test
        fun testBeanSignature2() {
            val resultOne = functionOne.invoke()
            val resultTwo = functionTwo.invoke()
    
            Assertions.assertEquals("FunOne", resultOne)
            Assertions.assertEquals("FunTwo", resultTwo)
        }
    
        @Test
        fun testFunctionSignature() {
            val one: TypeOne = "One"
            val two: TypeTwo = "Two"
    
            val resultOneTwo = testSignature(one, two)
            val resultTwoOne = testSignature(two, one)
    
            Assertions.assertEquals(Pair("One", "Two"), resultOneTwo)
            Assertions.assertEquals(Pair("Two", "One"), resultTwoOne)
        }
    
        fun testSignature(one: TypeOne, two: TypeTwo): Pair<TypeOne, TypeTwo> {
            return Pair(one, two)
        }
    }

    More information in the official Kotlin documentation on type aliases.

  • My LED clock got featured on Hackaday

    LED Circle Clock

    My LED circle clock got picked up by Hackaday — always a nice surprise to find your project featured there.

    The idea started when I found a 241-LED ring on AliExpress — a circular PCB with individually addressable RGB LEDs. It struck me immediately as a perfect analog clock face. The rings are designed to be separated but it is easy enough to wire them together into one continuous circle of pixels.

    How it works

    Each hand of the clock is a different color. Because the LEDs are discrete points spaced around the circle, I added antialiasing to make the hands look smoother — the brightness of neighboring LEDs is blended based on the exact angle, so the hands don’t just jump from pixel to pixel.

    The second hand was the trickiest part to get right. Rather than advancing one LED per second, it uses the milliseconds as a fractional offset, so it rotates continuously and smoothly. An ESP8266 runs the show, driving the LEDs and syncing the time from an NTP server so it is always accurate.

    To keep things fun, the clock occasionally breaks into a short animation — a Pac-man running around the ring, or a radar scan sweeping through the LEDs.

    Build your own

    All files are on GitHub, including the Blender models for the 3D-printed case. The LED hardware is easy to find: search for 241 LED ring on AliExpress.

    Animations

    Clock face
    Clock face
    Pac-man
    Pac-man
    Radar scan
    Radar scan
    Sparkle
    Sparkle
    Fire
    Fire
  • Workshop St. Michael College

    1. Download de Arduino IDE van https://www.arduino.cc/en/main/software of vanuit de windows app store
    2. Start de IDE
    3. Verbind de Arduino met de computer. Het kan zijn dat eerst nog een driver voor de USB<=>Serieel omzetter nodig is. Op de Arduino kan je zien welke chip gebruikt wordt. Meestal iets als CH340, CP210x of de FTDI.
    4. Open in File -> Examples -> Basics de “Blink” sketch.
    5. Verbind een LED met pin 13. Denk om de weerstand! Welke waarde moet die zijn? En hoe om moet de LED?
    6. Verander de frequentie van knipperen. Kan je ook SOS in morse knipperen?
    7. Open nu de File -> Examples -> Basics de “Fade” sketch en verbind de LED met de juiste pin. Hoe werkt dit?

    Zodra dit lukt haal je de draden weer uit de Arduino. Je kan ze nog wel samen met de LED in het breadboard laten zitten. Hierna druk je heel voorzichtig het beeldscherm in de connectoren. Kijk goed hoe het erin moet en of alle pennen netjes in de connector gaan. Stuk is het zo… Vervolgens naar Arduino Uno TFT 2.4” ILI9342.

  • Arduino Uno TFT 2.4″ ILI9342

    On AliExpress there are a lot of screens meant for the Arduino’s. Most of the time the driver chip is not mentioned in the description and that is how I ended up with 12 displays with the ILI9342 driver. Luckely AdaFruit has a library that supports the ILI9341 and from the documentation of those driver chips I found that they are almost identical. The difference is mainly the resolution. One has 320×240 and the othet 240×320. That means some axis need to be rotated and mirrored. Strange, but the colors were also inverted…

    That is what I did in attached library. I included some demo code to test the functionality.

    Using the display involves the following steps:

    1. Download the Arduino IDE from https://www.arduino.cc/en/main/software
    2. Make sure the USB to serial chip of your Arduino is supported. For Windows that could need one of the following: CH341SER_EXE or CP210x
    3. Download the ili9342 library
    4. Install the Arduino IDE
    5. Start the Arduino IDE
    6. Open “Sketch → Include Library → Add .ZIP Library…” and select the ili9342 library zip file
    7. Open “Sketch → Include Library → Manage Libraries…”. Search for the ‘Adafruit GFX Library’ and install it (including the dependencies)
    8. Open “Sketch → Include Library → Manage Libraries…”. Search for the ‘Adafruit TouchScreen’ and install it (including the dependencies)
    9. Open “File → Examples → TFTLCD-Library_ILI9342” and one of the example programs
    10. Select the correct Arduino board from “Tools → Board”
    11. Select the correct serial port from “Tools → Port”
    12. Upload the sketch to the Arduino from “Sketch → Upload”

    Excercises:

    1. Change the number of brick columns and rows
    2. Change the size of the bat and ball
    3. Also add a point if the bat hits the ball
    4. Change the bounce angle of the ball depending on the spot where the ball hits the bat
    5. Make the bricks more colorful
    6. Change scoring depending on what color of brick is hit
    7. Make some bricks that need to be hit twice to be deleted
    8. … Think of something yourself 🙂
  • WTF code fragments

    Those code fragments are real-life production fragments used in large corporate systems.

    Why should I just return only the value I need?

    // Do database query to request all statements matching the filter
    accountStatements = listStatements.execute( filter, null, balance.getCurrencyDate(), null, sortFilter, sortOrdering );
    
    AccountStatement lastStatement = null;
    if( accountStatements.size() > 0 ) {
       logger.debug("found " + accountStatements.size() + " statements for this currencyBalance... take last..." );
       lastStatement = (AccountStatement)accountStatements.get( accountStatements.size()-1 );
       accountStatements.clear();
    } else {
       logger.debug( "Nothing found for code " + balance.getGlobesCode().getValue() + "..." );
    }

    Lets take the last value of a list by walking over all entries

    for (int i = 0; i < result.size(); i++) {
       final CurrencyBalance currencyBalance = (CurrencyBalance) result.get(i);
       if (currencyBalance.getClosingBalance() == null) {
          curValue = null;
       } else {
          curValue = currencyBalance.getClosingBalance().getAmount().getValue();
       }
    }